Pages

Thursday, December 18, 2014

BlackBerry 8100 Charging ways


BlackBerry 8100 Charging ways 100 Tested solution

Read More..

Nokia C2 07 MMC is not working or it do not accept memory card it can be cause of water damage and rust It can be due to MMC jack and damage pins And this problem can be reason of MMC I C So lets check all these parts and try to Repair Memory card Problem in Nokia C2 07

if Nokia C2-07 MMC is not working or it do not accept memory card it can be cause of water damage and rust. It can be due to MMC jack and damage pins. And this problem can be reason of MMC I.C So lets check all these parts and try to Repair Memory card Problem in Nokia C2-07.


The above diagram have a red line to show you which parts are used in Memory Card function so check these parts and in first step try to clean them with electronics cleaner and apply some hot air to dry it.
Once it is dry check and if not working then replace this I.C to solve memory card problem in Nokia C2-07.
for more detail and new tips and tricks about cellphone service problem keep visiting this page we will update daily this blog timely with other mobile solution.
Read More..

Thursday, December 11, 2014

1110 battery low


1110 battery low

Read More..

NOKIA 2630 1 4 7 Easy keypad solution


NOKIA 2630 1 4 7 Easy keypad solution

Read More..

Sunday, December 7, 2014

Samsung Galaxy Pocket S5300 Network Solution


Samsung gt S5300 Network Jumper problem with the way Solution- any network - one of the primary functions of a smartphone smart phone could not get a good signal, if, this time, we will discuss the problem and a simple thatWhat, is to make it easy to contact Samsung Galaxy Pocket S5300 is the solution of the problem - the network. Phone signal or networ problem, often mobile, another hit or for many other reasons. Samsung S5300 here are few simple tips to overcome - we will talk about Samsung Galaxy S5300, a network simple idea - a network rehot or, as in the following picture to replace the coil, it suggests very are normal, but can often solve the problem Samsung Galaxy jiti less S5300 - a network, it may be useful


Samsung Galaxy Pocket S5300 Signal Jumper problem is not weak solution
On this blog to repair damage caused by the current solution or fault we just improve your mobile phone you want a little help in, MobileRdx.com is not accountable.

Samsung jiti S5300 signal problem, network Jumper, weak or less solve network problems 
Read More..

Nokia 5700 Lcd Display Light Solution Jumpers

Nokia 5700 Lcd Display Light Solution Jumpers
Read More..

Monday, November 24, 2014

Secret Codes for Nokia Mobile Phones

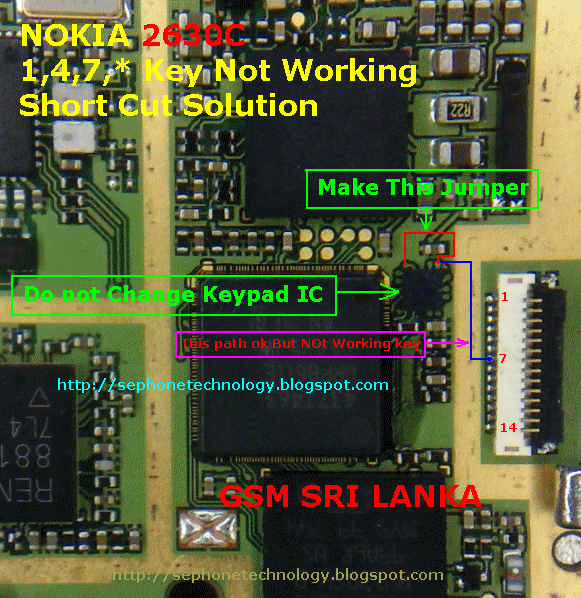
In this section, Phone Repairing will provide some free unlocking codes for Nokia mobile phones. Free codes that will be discussed below consists of a secret code to unlock the phones, to know the secret codes IMEI number, secret code to view the software version, secret codes to view private numbers and more.
Let us discuss one by one :
  1. Code to see the IMEI number is : press the button *#06#
  2. Code to view the software version, manufacture date and type of software compression : press *#0000# or if not work try : *#9999#
  3. Code to view call waiting status : press *#43#
  4. Code to view private number that contact your mobile phone : press *#30#
  5. Code to change the operator logo (especially for mobile phones Nokia 3310 and 3330) : press *#67705646#
  6. Code to show simlock status : press *#746025625#
  7. Code to set phone settings to factory settings : press *#7780#
  8. Code to show mobile phones serial number, production date, purchase date, recent repair date : press *#92702689#
  9. Code to show security code : press *#2640#
  10. Code to show bluetooth IP address : press *#2820#
  11. Code to activate EFR with the best sound quality : press *#3370#
  12. Code to activate EFR with lowest sound quality : press *#4720#
Read More..

Nokia 3110c MMC Problem

Are you users of the Nokia 3110c? The problems often encountered in mobile Nokia 3110c is the phone can not read MMC, or phone restart when installed MMC.

This can be overcome such as by flashing, but if you do not have Flasher box, you can use the following as alternative steps:


  1. Remove SIM Card

  2. Remove the MMC and Format MMC on your computer

  3. Turn on the phone without SIM Card and MMC

  4. Return the phone settings to factory settings

  5. Enter the MMC, and then format MMC by phone, then reset the phone

  6. Then insert the SIM card, then reset the phone

  7. Mobile return to normal
Read More..

Sunday, November 23, 2014

Friday, November 21, 2014

Nokia 101 Lcd Light Solution By Jumpering

Nokia 101 Lcd Light Solution
Read More..

How To Hard Reset Samsung Galaxy S II T Mobile


Cache partition How To Hard Reset Samsung Galaxy S II T-Mobile
http://goo.gl/u7bcizWipe cache partition


If the phone is not working correctly, you may need to master reset it and also clear the cache partition. These two resets clear different parts of the phone storage. Unlike a master reset, wiping the cache partition does not delete your personal data. http://goo.gl/u7bciz

To wipe the cache partition, follow these steps:
  1. Turn off the device. http://goo.gl/u7bciz
  2. Press and hold both Volume Up and Volume Down keys at the same time.
  3. Press the Power key only until the phone vibrates once, then release only the Power key.
  4. Continue to hold the Volume up and Volume Down keys until the Android System Recovery screen appears. http://goo.gl/u7bciz
  5. Press the Volume Down key to highlight wipe cache partition.
  6. Press the Home(GB only) or Power(ICS only) key to select. http://goo.gl/u7bciz
  7. Make sure Reboot System Now is highlighted and press the Home (or Powerkey to reboot.
Master reset
Master reset from settings menu

A master reset restores the original factory settings and may delete your personal data on the internal storage, such as downloaded content, ringtones, images, apps, and contacts. It does not delete data stored on the SIM card or SD card. http://goo.gl/u7bciz
To perform a master reset, follow these steps:
  1. Back up all data on the internal memory. See: Back up & restore
  2. Back up all necessary data that is on the internal memory.
  3. From any Home screen, tap the Menu key.
  4. Tap Settings. http://goo.gl/u7bciz
  5. Scroll to and tap Back up and reset.
  6. Tap Factory data reset.
  7. Tap Reset device.
  8. Tap Delete all.

Master reset with hardware keys

A master reset restores the original factory settings and may delete your personal data on the internal storage, such as downloaded content, ringtones, images, apps, and contacts. It does not delete data stored on the SIM card or SD card.
If the device menus are frozen or unresponsive, you can master reset using hardware keys. To perform a master reset, follow these steps: http://goo.gl/u7bciz
  1. Back up all data on the internal memory.See Back up & restore
  2. Turn off the device.
  3. Press and hold both Volume Up and Volume Down keys at the same time.
  4. Press the Power key only until the phone vibrates once, then release only the Power key.
  5. Continue to hold the Volume up and Volume Down keys until the Android System Recovery screen appears.
  6. Press the Volume Down key to highlight wipe data / factory reset.
  7. Press the Power key to select.
  8. Press the Volume Down key to highlight Yes - Delete all user data.
  9. Press the Power key to select.
  10. Press the Power key to reboot.
Read More..

Thursday, November 20, 2014

I phone 3G Charging


I phone 3G Charging
Read More..

samsung note 3 n9000 note 3 gear hard reset code


δ Power off the N9000 Galaxy Note 3 phone. Press and hold bothδ Volume Up + Home+power on. In the recovery menu select wipe data factory reset with Volume button. Press power to confirm. After hard reset completed, select reeboot system now!  All data will be lost! 
samsung galaxy note 3 hard reset

δ Unlock Samsung Galaxy N9000 password lock,δ resetting N9002, reset N9005

Press and hold POWER key for more than 7 seconds to reset the device if it has fatal errors or hang-ups, or freezes.

Your device freezes or has fatal errors
If your device freezes or hangs, you may need to close programs or reset the device to regain functionality. If your
device is frozen and unresponsive, press and hold the δPower key for 10-15 seconds. The device will reboot automatically.
If this does not solve the problem, perform a factory data reset. In Idle mode, open the application list and select
δSettings → Privacy → Factory data reset → Reset phone → Erase everything.

Select Settings > Privacy > Factory data reset: Reset your settingsδ to the factory default values and delete all your data.

Press Application button, then Settings > Reset settings: Reset your settings δto the factory δdefault values.

While using your device, be sure to back up important data. When disposing of your device, back up all data and then reset your device
to prevent misuse of your δpersonal δinformation.

Use this method to hard reset your Samsung Galaxy Note SM-N9005: Enter *2767*3855#. Warning! All your data including contacts, messages etc. will be lost! Copy all your necessary δdata/Contacts/Messages etc. to SIM or make backup to your PC δbefore full reset! Take out SIM card before full reset
Read More..

HTC One X Problems Roundup

HTC One X was one of the best smartphones of 2012 (at least from the features perspective). It has a clean and fashionable design, audio by Beats technology, a 4.7 Super LCD2 display with a pixel density of 312 and a resolution of 720x1280. Ive had this smartphone for a while and I must admit: if you go past the problems I will talk about in this article, its an exceptional phone. The display produces amazing images, it features a sound technology like no other, I really loved the 8MP photo camera and the video recording was amazing. But...

The Display
The first thing you notice about a smartphone is its display. Although the One X features an amazing display on paper, it comes with many problems. First, you can experience discoloration of the screen if you press the digitizer too hard. Even more, the discoloration can appear even if you dont press the screen at all. My phone was dropped on the floor from 0.7 - 1 meter. Ever since, I noticed a yellow tint in the left bottom corner. It was not too big, but it was damn annoying, especially on white background. Ive had many phones in my lifetime, and most of them got dropped on the floor sooner or later. But none reacted like this. And you dont want to know the biggest problem about the HTC One X display... If your device is out of warranty and you plan to change the display, you will never find a spare part that will match perfectly. Most of those spare displays are not even LCD2. So if you have a One X, take big care of it.

The Wifi
This problem does not appear on all HTC One X models, but when it does its a mood breaker. You will never get full signal on your One X WiFi indicator, even if you stand at 1 meter from the router. Why? Well, the quad-core version has a problem with the WiFi antenna, making almost impossible to see any WiFi networks without pressing the backside of the phone. By pressing, you will make the antenna touch to the connector and rebuild the circuit. But this happens as long as you press the back of the phone. Thats stupid, right? The fix for this is pretty simple, once you open the display (I strongly advice you not to try it by yourself, because you will damage the screen).

The Heat
If you own a HTC One X you know what Im talking about. It heats like crazy once you use it for more than reading your mails. I was not able to find a fix for this problem, and I do think its a hardware problem.

The 3G Signal
The One X automatically switch from HSDPA to 3G when the signal is low, making the battery drain faster. And if we are on this subject...

The Battery
I have not used the Samsung Galaxy S3, but the battery on HTC One X drains like crazy. I have never managed to use it via 3G for more than 2 hours. Maybe thats normal, but I got way better battery time on my N8, also on my iPhone 4.

The Sound
As I said in the beginning, the video quality when you record a video its amazing. But the audio for that video is terrible. I have no words to describe the poor quality of audio recording. Its trash, just trash. I was really disappointed by this, because I really loved the camera on One X. Until now, there is no fix for it. The sound via headphones is great, but the speaker is not that great either. Although it features Beats Technology, my old iPhone 4 had better speaker sound than One X.

The charging time
You know what I hate more than a poor battery? A slow charging time. The first time I got my hands on One X, I got the battery down to zero in no time. I thought to myself: "Ill just plug it in my USB port and it will charge in no time while Ill play with it some more". After 20 minutes, my phone was still drained. The problem? The One X charges better when connected to electric socket, and not via USB. If you plan to charge it via USB, it will take a lot of time and you better forget it.

Other HTC One X problems
These problems were not encountered by me, but Ive read about them on various forums. Sometimes, the screen acts crazy, showing random errors. Another problem encountered by users is not waking up when pressing the Power button. Other users experienced freezes when the phone was used for a long period of time.
Read More..

Blackberry 8310 8320 Buzzer Ways Jumper

Blackberry 8310 8320 Buzzer Ways
Read More..

Send incoming calls to voicemail with HTC EVO

The HTC EVO smartphone runs on the Android mobile operating system from Google . The EVO lets you control when receiving calls and when sent directly to voicemail . You can choose between many different ways to send calls to voicemail , each with a slightly different effect.
Declines the call

When declining an incoming call rather than answer , the call is sent directly to your phone voice mailbox . This method to send calls to voicemail does not require any configuration change and can be done directly from the display of the incoming call. To decline a call, tap the red button "Ignore " on incoming call Lcd instead of the button " Reply " .Airplane ModePut your device into Airplane mode disables all wireless connections on the device. You can not connect via Bluetooth or the web via Wi-Fi or 4G , and you can not make or receive any calls. Demands are sent directly to your voicemail . To place your device in Airplane Mode , press and hold the power button until the menu appears and plays the "Airplane Mode " option.Mode DDTMThe DDTM mode prevents incoming texts and calls interrupt your data connection. Unlike the Airplane Mode , this mode does not disconnect the Bluetooth, WiFi or 4G, but sends all incoming calls directly to voicemail . To place your device in this mode, press the "Menu " button and tap the "Settings " option. Then tap the "Calls " tab and place a check mark in the " DDTM Mode" option .disable networkIf you disable the network from your device , you can not receive any phone calls and send any incoming calls directly to your voicemail. To disable the network , tap the "Menu" button, then the "Settings " option. Tap the " Wireless Networks " tab and remove the check mark next to the " Mobile Network" .
Read More..

Wednesday, November 19, 2014

Nokia 1202 1203 1661 1662 no network solution

Nokia 1202 No Network Solution
Nokia 1203 No Network Solution
Nokia 1661 No Network Solution
Nokia 1662 No Network Solution
Read More..

Samsung Galaxy Mini 2 Full Shorted Solution Jumpers

Samsung Galaxy Mini 2 Full Shorted Solution Jumpers
Samsung Galaxy Mini 2 Full Shorted Tested Solution 
Samsung Galaxy Mini 2 Full Shorted Problem Solved
Read More..

Nokia 3110c Sim Layout missing jumper ways


Nokia 3110c Sim Layout missing jumper ways

Read More..

Nokia E7 Speaker Ways Solution


Nokia E7 Speaker Ways Solution
Read More..

HTC One X How to Backup and Restore Data and Application

When we hear the name of Windows, then we will refer to an operating system. Yes, with the popularity, Windows has dominated the market for computer operating systems, and continues to grow in the mobile operating system for Windows Phone canopy. Is commonplace when both types of Windows operating systems were connected. However, the Windows Phone market is very small making it only a few people who use it. With the mobile operating system market dominated by HTC One X, HTC One X users will certainly feel happy if it can connect to the operating system that dominates the computer world, none other than the Windows. Both will make a tremendous relationship. Data on HTC One X, we can connect on Windows. With this, we will not worry if it happens sometime unwanted things on our HTC One X phones. So, how do I backup HTC One X to Windows computer?

Data on HTC One X phones that we have will be used at any time. Therefore, we kept it in the phone. However, could not the things we want to happen on the phone, such as damaged or stolen. The ability to backup HTC One X is a great idea for us to do, which will secure the data if at any time there unwanted things on the phone. With the way HTC One X backup to a Windows computer, then you will get an easy solution to secure your important data.Using HTC BackupHTC Backup uses your Dropbox storage to keep your content and settings. It can back up and restore the following:
Home Lcd settings These include your categories and headlines in HTC BlinkFeed, widgets, and Home Lcd layout.
Accounts and passwords HTC Backup stores the login credentials for many popular email and social network accounts, including Exchange ActiveSync, Microsoft Hotmail, Flickr, LinkedIn, Evernote, and POP/IMAP.
Apps and settings These include your web bookmarks, personal dictionary, Wi-Fi networks, apps youve installed, grid size and sort order in the All apps view, and over 150 other settings.

Backing up HTC One X/One X‍+
Turn on HTC Backup to do a daily backup of your phone over Wi-Fi. You can turn it on by selecting Back up phone daily while doing the on-device setup, or enable it in Settings.

1. Go to Settings, and then tap Backup & reset.
2. Tap Backup account.
3. Choose HTC Account as your backup account, and sign in to your account.
Note:
  • You can sign in with your HTC Account or Facebook account.
  • If youre already signed into your Google Account, tap it to change your backup account to your HTC Account.
4. Sign in to Dropbox, if you havent done so.

Tap Turn on to have your photos and videos uploaded to Dropbox as you capture them.

5. To do a daily backup, make sure the Automatic backup switch is on. You can also tap Back up now to manually back up your phone anytime.
Note: Depending on the amount of content, doing a manual backup may incur additional data costs and take a long time. Using a Wi-Fi connection is recommended.

Youll see the most recent backup date and time under Backup history.Restoring your backup to your phone
If youve used HTC Backup before, you can restore your backup to HTC One X/One X‍+, or to a new HTC phone.
Important: Depending on the amount of content, restoring your backup to your phone may incur additional data costs and take a long time. Using a Wi-Fi connection is recommended.
  1. When you turn on a new HTC phone for the first time or after a factory reset, choose to restore content, and then select Restore from HTC Backup on the Set up phone Lcd.
  2. Sign in using your HTC Account or Facebook account, depending on which one you used to back up your phone before.
  3. Sign in to the same Dropbox account that you used to back up your phone, and choose to allow HTC Backup to access Dropbox. Your backup history will then be displayed.
  4. Select a backup, and then tap Next.
  5. Wait for your settings to be restored.
  6. Tap OK to continue restoring your previously installed apps.

Your apps will be restored in the background, and you can track the progress via a notification in the status bar. Your apps will appear in the All apps view as they are installed. The All apps and Home Lcd shortcuts will be reorganized as in your backup after all of your apps have been installed. You may continue using your phone while apps are being restored.
Tip: You can also go to Settings, and then tap Backup & reset > Restore from HTC Backup.

Before this, make sure youve already signed in to the same account that you used to back up your phone before. Also, if youve started changing settings or data on your phone, clear the App data and settings restore option before restoring your backup to avoid overwriting them.

Using Other Android App


1 . My Backup :
My Backup is one of the popular free app to backup data from your Android phone . This app works on almost all android phone and can take a backup of Applications , Photos , Contacts , Call log , Browser Bookmarks , SMS ( text messages ) , MMS , Calendar , System Settings , Home Screens ( including shortcut positions ) , Alarms , Dictionary , Playlists you can save the music to the SD card or to an online storage .

2 . Titanium Backup :Titanium Backup is probably the most powerful tool for creating backups on Android with a number of features . You can backup , restore your apps + data + Market links.

This includes all protected apps & system apps , plus external data on the SD card . You can also perform batch backups and schedule backup . Theres even the option to backup your files to Dropbox . You can move any application or data from the application to the SD card

3 . Mobile Backup II :The free app is simple to backup and restore your phone data via SD card anytime anywhere . The application is easy to backup and restore your mobile data ( Calendar , Contacts , SMS and Call Log ) in SD card . Backup data is stored in the root directory of the SD card .
4 . App Backup and Reinstall :
As its name suggests , this application can take backup of your installed applications and games on your Android phone . You can easily re-install the applications you have taken from the backup . You can classify as apps and game backups .
5 . My Phone Explorer :This is a totally different concept in the backup where you can pick up contacts , SMS and other call log backup to your PC . This means that you can keep contact and other details of sync with the phone . You need to install a client application on Android and install a desktop application that can be downloaded from here . There are many more applications for backup , but from some of the app above include only the best . You can choose the application that best suits you and also depends on what all you want to backup . Contacts and SMS are two things that most users want to backup .
Read More..

Nokia C2 03 C2 06 C2 08 Insert Sim Solutions By Jumpers

Nokia C2-03,C2-06,C2-08 Insert Sim Solutions By Jumpers
Nokia C2-03,C2-06,C2-08 Insert Sim Solutions 
Nokia C2-03,C2-06,C2-08 Insert Sim Problem
Nokia C2-03,C2-06,C2-08 Insert Sim Jumper Ways

Read More..

Tuesday, November 18, 2014

HTC One X How To Change Background

It is definitely boring if wallpaper (your home Lcd background) that are used only-thats it. Changing the wallpaper will create a new atmosphere and increase comfort while using your HTC One X phone. There are two types of wallpaper that you can use on HTC One X, the first so-called static wallpaper or wallpaper that is static (not moving) and the other one is a live wallpaper which is the wallpaper that is dynamic (moving).

How to change the wallpaper on Android HTC phones is quite easy:
  1. Go to Settings, and then tap Personalize.
  2. Tap Wallpaper.
  3. Tap one of the following:
    HTC wallpapers Choose a preset wallpaper, and then tap Preview.
    Live wallpapers Choose a preset animated wallpaper, and then tap Preview. If the animated wallpaper you chose can be customized, tap Settings.
    Computer photos Use the HTC Get Started service to choose a photo from your computer and use it as a wallpaper on HTC One X/One X‍+.
    Gallery Choose an existing photo and crop it.
  4. Tap Done or Apply.

With these five steps you can change the wallpaper on your HTC One X. There are many wallpapers available on the outcome there either static or live wallpaper, free or paid, all of which you can download in the Google Market. One example of the simplest static wallpapers that you can download in the Google Market is the application of Colors. Colors with the application, you can specify only solid colors on your home Lcd, such as black, white, light blue, golden yellow, and so on. Additionally you can use the image as wallpaper static, eg your photos with lover or family, so you will always see the photos when accessing your home Lcd.

One example for an interesting live wallpaper is Blue sea. This live wallpaper will make your Lcd like on the sea with a soothing blue colors and moving bubbles floating. You need to know that the live wallpaper is very interesting, especially to make friends and impress your relatives, but the use of live wallpapers will waste battery consumption. Therefore, I advise you to use a static wallpaper if your battery life is a priority.
Read More..

Nokia 7230 earpiece speaker repair solution

Heres the solution for Nokia 7230 Earpiece speaker problem. This solution may help fix and repair if there is no audio sound can be heard over the earpiece speaker.

The solution below shows the two filter coils and a ESD protection resistor that needs to be check or replace if the earpiece speaker is working okay and the flex cable wire is also well and or already tried and replacing a new spare.
Nokia 7230 Eapiece Speaker No audio sound solution
nokia
The GAZOO IC holds the earpiece audio signal that being feeds to the earpiece speaker. If all corresponding components such as the speaker, flex cable and the filter coils showed on the above location, you may then suspect that the problem lies on a faulty GAZOO IC. Reworking it might possibly solved the problem
Read More..

Nokia 3110c Sim Layout missing jumper ways


Nokia 3110c Sim Layout missing jumper ways

Read More..

Nokia 5220XM Ringer Hands Free Loud Speaker No Sound Solution

Heres the solution for Nokia 5220 Xpressmusic Ringer and Integrated Hands Free (IHF) Speaker that No sounds output can be heard on it.
If ever encountered this problem, you need to check the earpiece speaker first if it already busted or damaged.
If the speaker is working okay but still there is no audio sound output can be heard when being activated, you may use this solution below to trace the line paths and check particular components on Nokia 5220 PCB board that holds the IHF speaker circuit. This solution covered for left and right channel speakers connection.
Nokia 5220 Xpressmusic Ringer and Hands Free Speaker No Sound Repair Solution
nokia
The IHF speaker left and right audio signal is feed from the power and audio IC (AVILMA) then filtered by a non polar capacitors before it feeds to the audio amplifier IC. The audio amplifier chip is the one that boosts or amplify the audio signals to make it sounds louder and better.
The boosted or amplified audio signal is then feeds across to a filter coils, bypass capacitors and an ESD protection resistors before it get through to the IHF Speakers.  Hints for Troubleshooting:
a) check the earpiece speaker first by using a multimeter.
b) clean the speaker terminals and contact pads.
c) check or replace the filter capacitors, filter coils and resistors if found damaged.
d) check the corresponding line paths of each corresponding connections
e) if all line paths and components is okay: Rework  the audio amplifier IC or replace if it doesnt work.
f) If all of the above is already been done but does not solved the problem, You may then proceed to rework the audio IC.Trace the line paths to each corresponding solder ball bumps that holds for the IHF audio signals before in-placing it back.
Read More..

How to Remove Folder File Can not Delete On HTC One X

Folders or files on Android Smartphone is sometimes stubborn and very difficult to be removed. Quite often we are also experienced in the file that could not change the name or rename.

This is often the case in our Android phone by searching Mobile-phone team who often experience such as the Samsung Galaxy, Mini, Young, SI, II, III, and 4 or the Galaxy Tab. To that end, heres how to delete files that are difficult to delete the normal way.

1.Back up apps and data with titanium back up / backing up android / cwm back up
2. Move entire folders and data to the sd card healthy pc (without virus)
3. Delete FOLDER that can not be deleted / delete
4.FORMAT SD CARD
5. Back data backed up to your Android phone
6.Restore app and back up data on use titanium back up / android back up / cwm back up earlier
7. Finish
Read More..

HTC One X How To Add Album Art album covers and artist photos

Album cover is the front of a commercial sound recording product packaging (album). At the beginning of the 20th century, when the song was recorded in the form of vinyl records, album cover appeared with a plain face, only include the basic information of an album. But now many of the album cover with a lot of variation images.

In the smartphone era become more flexible Album Art. You can with as you adjust to your liking.

To Add Album Art on HTC X you can follow these steps:

To save on data usage, you might want to connect to a Wi-Fi network when updating your album covers and artist photos. In Music settings, select Wi-Fi only.
  1. Open the Music player app.
  2. Tap icon , in list  select Artists or Albums.
  3. Tap > Update artist photos or Update album art.
If you want HTC One to automatically check and update your music collection, tap on the Music apps main Lcd, and then tap Settings. Select Album art and Artist photos.Or you can also use the app as you can Itag in google play or apk file which you can download here.
How to use  Itag,:1. Install Itag
2. After finished open Itag app
3. Tab Song and Open your music want to add Album Art
4. Find and select songs that will be replaced his album art
5. Tab Pick picture
6. Select the photo / image to be used as album art
7. Scroll down,  and select Save 
Read More..

Monday, November 17, 2014

HTC One X How to Delete Apps

On HTC One X , a lot of useful applications , and we can download for free or paid . But there are also applications that do not fit or do not fit our expectations with us . If we do not do the cleaning , the resources or resources such as memory and storage ( storage media ) will be limited , will also be filled with folders and hard to find applications . Then we need to do cleaning by removing unused applications that are permanently from our HTC One X Smartphone or Tablet that folder we will neatly arranged and also to keep the memory and storage resources .

There are 2 way to remove HTC One X apps with ease , the following steps to remove HTC One X apps . Since I was a user of Samsung Galaxy Note 2 , then I wear it as an example of the guidelines.

How to Remove HTC One X application from Google Play Store
uninstall HTC One X application
1 . Click [ Play Store ] to enter the applications Google Play Store
2 . Go to [ Menu ]
3 . Click [ My apps ] , then it will display a list of HTC One X applications that have been downloaded previously .
4 . Select and Click HTC One X application that will be removed .
remove HTC One X apps
5 . Click [ Uninstall ]
6 . Will display the message " Do you want to uninstall this app ? "
7 . Click the [ OK ]
8 . Wait a minute for the removal process ( Uninstalling. ...... )
9 . Once completed, the Play Store will be on applications that have been installed .
HTC One X apps you have deleted permanently from your HTC One X gadget .
How to Delete Applications from the HTC One X Settings Menu
remove HTC One X apps
1 . Go to Menu Settings with Click [ Setting ]
2 . Click [ Application Manager ]
3 . HTC One X Application and click Choose to be removed
uninstall HTC One X application
4 . Click [ Uninstall ]
6 . Will display the message " Application will uninstalled "
7 . Click the [ OK ]
8 . Wait a minute for the removal process ( Uninstalling. ..... )
9 . Once completed , the note " uninstalled "
10 . Click the [ OK ]
HTC One X apps you have deleted permanently from your HTC One X gadget .
Read More..

Nokia X7 00 schematic and service manual


Nokia X7-00 schematic and service manual
can be found on this source
Read More..

Sony Ericsson Xperia Arc LT15i Display Light Soltuion


Sony Ericsson Xperia Arc LT15i Display Light Soltuion, Sony Ericsson Xperia Arc LT15i Display Light Soltuion with jumpering
Read More..

nokia Asha 200 Camera Problem Solution Jumper Ways

if Nokia Asha 200 camera is not working we can not take pictures and make video from Nokia Asha 200.for making video or taking snaps it is to much necery that we solve Nokia Asha 200 camera problem so that it can be used for taking snaps and photos.


to solve Nokia Asha 200 camera switch button we can follow steps as given in above diagram.first remove camera from jack and check its points may they have some carbon or water damage so clean these point with electronics cleaner and aplly some hot air to dry board.
then check all these track as shown with differnent colors in above diagram.all these colores define path and track and parts which are used in camera function.so if any link is broken apply jumpers and parts are missing or damag replace them to solve Nokia Asha 200 camera not working problem solution.
for more detail and new tips and tricks about cellphone service problem keep visiting this page we will update daily this blog timely with other mobile solution.
Read More..

Nokia N97 Damaged Mini USB Charging Pin connector terminal pads jumper solution

Heres the jumper solution for Nokia N97 damaged or lifted USB pin connector terminal pads on the PCB. This solution shows the alternative jumper ways to solve the problem.

Nokia N97 damaged charging pin jumper ways- charging problem solution
nokia
 Note: components mounting configuration may differ from original PCB Board
If the solder pads is lifted you may apply jumper to corresponding components shown at the solution above.
Read More..

Nokia 7230 Memory Card Not Detected Repair Solution

If ever having a problem on Nokia 7230 that indicates No Memory Card detected even tried to inserting a working microSD memory card but the the device unable to read it or detect it. This solution below simply shows the particular components that needs to be check, trace and or replace if having memory card problem on Nokia 7230.
Nokia 7230 Memory Card Not Inserted Problem Solution
Nokia

First, ensure that the memory card slot pins are free from oxidation and foreign objects. Check also that it is not damaged or misaligned and still properly soldered. Trace and check the voltage supply line paths as well also the ground line. If the voltage supply and ground lines is okay, but the problem still exists, you may then suspect that the problem lies on the GAZOO IC, reworking or re-balling the chip might possibly solved and fix the problem
Read More..

Sunday, November 16, 2014

iPhone 4 Battery Connector Solution


iPhone 4 Battery Connector Solution

Read More..

Nokia E63 Power Button Solution


Nokia E63 Power On Off Key Switch Broken Problem And Jumper Solution With Simple Jumper Way Line Solution. Make This Jumper Or Apply This Solution On Your Nokia E63. When You Are Face To Nokia E63 Power Switch Problem And Unable Switch On Your Nokia E63 Handset, Then Apply This Solution On Affected Nokia E63 Mobile Phone.
Read More..

Nokia C1 01 Charging Not Respones


Try to make Jumper the Fuse On Charging Circuit still Same Problem Then,Remove tiny CrystaL Driver beside the Charging Fuse ( * ) Problem Solve
Read More..

Nokia 6630 Tested Charging Solution

Nokia 6630 Tested Charging Solution
Read More..

iPhone4 after water damage not recognize the BaseBand chip check the components


iPhone4 after water damage not recognize the BaseBand chip check the components

Read More..

Saturday, November 15, 2014

Nokia 1661 Keypad Ic Jumpers


Nokia 1661 Keypad Ic Jumpers
Read More..

Nokia 2700c Camera On Standby Problem


Nokia 2700c Camera On Standby Problem
Read More..

Nokia X3 Display problem solution Full Display IC Jumper ways

Heres a full display problem solution for Nokia X3, If you ever having tried to replace a new LCD module replacement and updating the firmware by only trying to fix a Display problem, like White Lcd, Blue Lcd, blank Lcd, garbled, saturated and etc on X3. but the display problem still unsolved.This solution below shows the connection of display ESD filter IC to each certain pins of the B2B connector.
Nokia X3 display problem solution
nokia
 Nokia X3 display IC line tracks
If the the Display ESD filter chip is damaged this will result to display problem issues. By replacing them will only possibly solved the problem.
Read More..

Nokia 2690 White Screen Blue and Blank Screen LCD Display Problem Solution

Heres a solution that may possibly help fix and repair Nokia 2690 LCD Display problems like white Lcd, blue Lcd, black or blank Lcd displays. If youre having tried to replace a new LCd display module replacement when trying to repair display problem on Nokia 2690 but nothing happens and the problem still exists. This solution below shows the connection of LCD display data signals from the application processor chip to  each single pins of the LCD connector.

2690 LCD display connection line tracks ( display jumper ways)
Nokia
The solution above shows a detailed information of the display data signal being feeds from the application processor IC to the LCD display pin connector. Each line is been filtered by a resistor that has resistance value of 33ohms each. You may check each resistor and trace each particular line paths, replace the resistor if found damaged or by then apply a jumper for an open line or cut connections.
Read More..

nokia 111 display light solution jumpers

nokia 111 light problem , nokia111light problem , nokia 111-2 light problem , nokia111light problem, 111, nokia 111 light problem solution, nokia111laight solution ,
 

111-2 light solutin on gsm forum, nokia 111 light nokia 111 light carquet, nokia 111 light soi, nokia 111 leteast, ways, nokia 111 liqht problem solution this solution many time tested see and try this i hope solved your problem.
Read More..

Friday, November 14, 2014

Nokia C2 08 Insert sim ways problem solution jumpers

Nokia C2-08 insert sim problem, Sim is not working in Nokia C2-08, Sim is not Valid, Single Sim is not working in Nokia C2-08
Tools:-
Nokia T4 and T5 key, Electronic meter, Electronics Cleaner, Hot Air, Solding Iron, Jumper Wire.
 

Diagnostic and Solutions.
if sim is not working in Nokia C2-08 is can be cause of water damage or missing components. Use different sim and if sim is not working then de assemble Nokia C2-08.
Once Mobile phone is disassemble check all these parts that are given in above diagram and apply electronics cleaner. Apply hot air so that it can be dry but not to much because it can damage the mother board or may can harm your skin.
these different color lines are indicating different path and tracks that are used in sim function in Nokia C2-08 so if nay of them is missing apply that jumper as shown in diagram to solve insert sim problem in Nokia C2-08
If single sim is not working out of these two you can only jumper those parts that are used by it. And to find prints and track you can see above diagram.
Warnings:
Do not apply to much heat it can damage the mother board and harm your skin.
When apply jumpers make sure the do not be ground with other prints.It can short the mobile phone.
Remove Sim Ic with hot air because with Solding iron it might can damage prints also.
for more detail and new tips and tricks about cellphone service problem keep visiting this page we will update daily this blog timely with other mobile solution.
Read More..

Nokia 5230 memory card corrupted MMC problem solution

Memory Card Problem in Nokia 5230 can be solve with a few steps that are given in this post.you can see diagram bellow and do same steps as give.in case of MMC Nokia 5230 will not be able to show Memory Card and will not be able play data in memory card.
Nokia
to solve memory card problem view all parts and tracks as given in diagram above.memory card tracks shown in different colors and you can see path easily.resold mmc ic and if not work replace it with new one.
for more detail and new tips and tricks about cellphone service problem keep visiting this page we will update daily this blog timely with other mobile solution.
Read More..

Nokia 5130 Handsfree Track ways


Nokia 5130 Handsfree Track ways
Read More..

Thursday, November 13, 2014

1661 Not Charging Problem


1661 Not Charging Problem

Read More..

Nokia 1650 Keypad Ways


1650 Keypad Problem 1650 Keypad Ways 1650 Keypad Tracks 1650 Keypad Jumpers 1650 Keypad Not Working
Read More..

Samsung Monte S5620 Hard Reset

Samsung Monte S5620 Hard Reset
Hard Reset:

    Enter dial no *2767*3855#
    Now your handset show E2P Full Reset
    Wait for restart handset
    hard reset done
Read More..

Nokia 6301 Mic solution here


Nokia 6301 Mic solution here
Read More..

Hard Reset Your Sony Xperia go advance ST27i ST27a

How To Hard Reset Your Sony Xperia go / advance Easily

When You Have To Hard Reset ST27i / ST27a ?

You Can Apply Hard Reset In Many Cases We Will Tell You Some Example
* Forgotten Pattern Lock ( Unlock Pattern Lock )
* Forgotten Phone Lock
* Forgotten User Code
* If Your Phone Seems Frozen Due To Any Cases.

Take Care oi These Factors Before You Reset Your Xperia go

* Please Backup Your Datas Using any Backup Software
* Please Maintain 90% Battory Charge

How To Hard Reset Your   Sony Xperia go / advance ( ST27i,ST27a)


* Switch Off Your Device
* Take Out Your Sim And Memmory Card
* Press And Hold  Volume Up Key  + Power Key
* Hold Pressing Keys For Severel Minutes
* Then You Will Get Factory Reset Menu
* Follow The Menu At Lcd Screen
* Enjoy !
Read More..

Samsung Galaxy S2 Charging Problem

Samsung Galaxy S2 Charging Problem
Read More..

Wednesday, November 12, 2014

NOKIA N8 SPEAKER PROBLEM

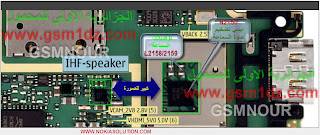
NOKIA N8 SPEAKER PROBLEM:
SPEAKER PROBLEM IS A COMMON PROBLEM FOR ANY CELL PHONE , HERE IS SOLUTION IMAGE FOR NOKIA N8 SPEAKER PROBLEM.
Read More..

Nokia Lumia 800 Restore Factory Hard Reset Format

If you have Nokia Lumia 800 problems and want to restore the smartphone then this post will help you to fix cellphone software problems. Due to software problem smartphone can hang, voice issues, data damages, camera stand by and blue tooth and wifi problems.

It will remove all the data ,contacts and apps that you installed
In touch Lcd mobiles it can be software problem also if touch is not working well.To solve these problems try the following steps.
Charge mobile phone battery, Make backup of your impotent contacts data and media files if possible and in most cases take out SIM and SD card.
After reset of Nokia Lumia 800 you will lose all the data and it will be impossible to get it back.so online backup is always important. Try to save all your data, backup on external device or hard drive.
So lets start the Nokia Lumia 800 Restore Factory, Nokia Lumia 800 Hard Reset.
Turn Off the mobile phone for few mints.
Make it Power On
Turn off your Nokia Lumia 800. Press and hold the following buttons Camera + Volume down + Power until your phone vibrates, then release only the Power key and keep pressing the Camera + Volume down for a couple of seconds 4-5s.
On the Start Lcd,
Tap Settings > about phone.
Tap reset your phone, and then tap yes.
The factory setting for the lock code is 12345
Read More..

Samsung C3222 Ringer Jumper Ways

Samsung C3222 Ringer Not Working Solution
Read More..