Friday, October 31, 2014
Nokia e52 fake charging solution with Ic
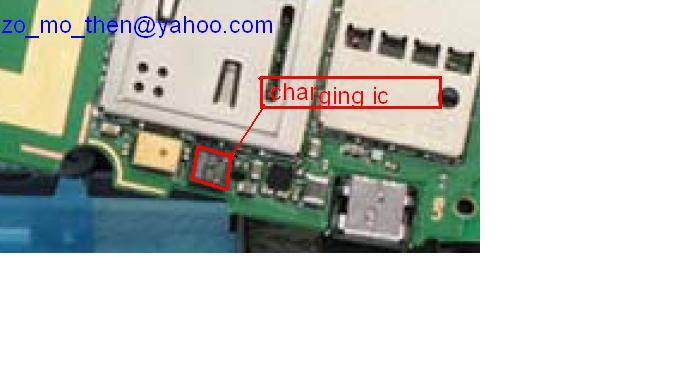
when you plug in charge to charging pin of nokia e52 and it shows charging indication but do not charge the battery. It can be the fault of charging IC that is given in repairing diagram of nokia e52 for not charging or fake charging.

dis assemble the mobile phone and then find out if there is rust water damages or burn and carbon on the smart phone mobile.Clean the mother board with electronics cleaner and apply some heat with hot air to make it dry.
Re sold the Ic and Re flow it. If resolding can not solve not charging or fake charging problem in nokia e52 replace this IC that is used for Charging function of nokia e52.
for more detail and new tips and tricks about cellphone service problem keep visiting this page we will update cellphone service diagrams timely with new cellphone diagrams.some related post are also given bellow you can read them also for more information about cellphone.
Read More..
dis assemble the mobile phone and then find out if there is rust water damages or burn and carbon on the smart phone mobile.Clean the mother board with electronics cleaner and apply some heat with hot air to make it dry.
Re sold the Ic and Re flow it. If resolding can not solve not charging or fake charging problem in nokia e52 replace this IC that is used for Charging function of nokia e52.
for more detail and new tips and tricks about cellphone service problem keep visiting this page we will update cellphone service diagrams timely with new cellphone diagrams.some related post are also given bellow you can read them also for more information about cellphone.
Thursday, October 30, 2014
How to reset a nokia N96
Codes & Hidden features
Nokia Code : *#06#
To check NOKIA IMEI number (International Mobile Equipment Identity)
Nokia Code : *#0000#
NOKIA Firmware version and date, Phone Model and Operator Variant
Nokia Code : *#92702689#
Life timer (W A R 0 A N T Y) - The amount of time your phone has spent sending and receiving calls.
Nokia Code : *#62209526#
Wireless MAC Address (M A C _ W L A N)
Nokia Code : *#2820#
Bluetooth MAC address (B T A 0?)
Nokia Code : *#7370#
NOKIA Format phone (Soft Reset)
Nokia Code : *#7780#
NOKIA Factory Reset (Hard Reset)
Read More..
Nokia Code : *#06#
To check NOKIA IMEI number (International Mobile Equipment Identity)
Nokia Code : *#0000#
NOKIA Firmware version and date, Phone Model and Operator Variant
Nokia Code : *#92702689#
Life timer (W A R 0 A N T Y) - The amount of time your phone has spent sending and receiving calls.
Nokia Code : *#62209526#
Wireless MAC Address (M A C _ W L A N)
Nokia Code : *#2820#
Bluetooth MAC address (B T A 0?)
Nokia Code : *#7370#
NOKIA Format phone (Soft Reset)
Nokia Code : *#7780#
NOKIA Factory Reset (Hard Reset)
T Mobile G1 Android hard reset Solution
T-Mobile G1 Android hard reset Solution
Before you buy a new cell phone or new tablet, please try the following procedure to repair your device. First charge your battery, backup your important data if possible and in most cases take out SIM and SD card. It is impossible to recover your data after doing a hard reset, so online backup is always important. For all of your data, a backup should be done on an external device, hard drive, raid system or media. With or without insurance, if your cell phone lost, damaged or stolen at least your invaluable data is backed up in a safe place.

Resetting the T-Mobile Google G1 Android Phone

Resetting the T-mobile G1 Google phone deletes all data, including downloaded applications, and resets the phone back
to its initial state before you turned on the phone for the first time. Important Make sure to back up important data you have on the phone before you perform a factory data reset.
T-mobile G1 Android hard reset
1. The device must be powered OFF to G1 hard reset.Note: If the device is not responsive and does not turn off, remove the battery and re-insert it.
2. Press and hold the Home button and the Power button at the same time.
3. Keep holding Home and Power together for at least 25 seconds, even if the "Startup" screen appears.
4. Release the keys when you see a black screen with a warning sign.
5. Slide the keyboard open.
6. As a shortcut, press ALT+W to factory reset the device. If this does not work, continue with the below steps.
7. Press ALT+L.
8. Press Alt+W for wipe data/factory reset.
9. Press the Home + Back key.
Note: You can also remove the battery and re-insert it.
1. Press HOME > MENU, and then touch Settings.
2. Scroll down the screen, then touch SD card & phone storage.
3. Navigate to the Internal phone storage section, then touch Factory data reset.
4. On the Factory data reset screen, touch Reset phone. If prompted, enter your screen unlock pattern, then touch Erase everything.
Tip If your phone hangs or freezes, remove the battery, then wait for a few seconds, and then re-install it. After re-installing the battery, turn on the phone.
Wednesday, October 29, 2014
Nokia X5 01 MMC MicroSD Memory Card Not Detected Corrupted Problem Solution
Heres a full solution for Nokia X5-01 MMC microSD memory card problems such us "memory card not detected and memory card corrupted.
The following solution below shows the complete connection line paths of the Nokia X5-01 MicroSD pin connector through to the Memry card filter IC which can be used for easy tracing and check up procedures.
 The memory filter IC is mounted or located at the top side of the noikia X5-01 PCB board. You may need to remove it for tracing the MMC pin connector line paths. IF all the corresponding line paths were okay, replacing the MMC filter IC might help solve the Nokia X5-01 insert sim card problem.
The following solution below shows the complete connection line paths of the Nokia X5-01 MicroSD pin connector through to the Memry card filter IC which can be used for easy tracing and check up procedures.
Nokia X5-01 MMC memory card problem solution

Nokia C6 Camera Switch Volume Up and Down Button line paths solution
Heres the solution for Nokia C6-00 Camera Switch and volume up and down control buttons that doesnt working. This solution may only works and can be applied if the switches assembly is okay and or already been replaced but still it doesnt respond when being pressed.
The solution below shows the line paths of these said switches to the two EMI filter Ics which can be used to trace its lines paths or to determine which filter IC has to be checked or then replaced if found damaged.

The solution below shows the line paths of these said switches to the two EMI filter Ics which can be used to trace its lines paths or to determine which filter IC has to be checked or then replaced if found damaged.
Nokia C6-00 Camera Switch and Volume UP/Down control buttons solution

Friday, October 24, 2014
Blackberry 8800 usb not recognize solution
blackberry 8800 usb Line Ways Solution , blackberry usd not connected solution many time line ok but not working usd cable this solution try blackberry usd line not working solution , blackberry 8800 usd print damage solution blackberry usd ic ok but not working, solution blackberry 8800 usb not detected solution ,blackberry 8800 usb not working any idia have this idia try my solution 100% tested solution here see this solution only change this ic 100% solve yoyr phone usb not recognize
blackberry 8520 hange on blackberry logo 100% tested

many time tested this solution
Thursday, October 23, 2014
I Phone 4s camera solution 100 tested solution here
I Phone 4s camera solution 100% tested solution here ,if u have i phone 4s phone but your phone all ok but not working camera i have this problem 100% working solution this solution working i phone 4s camera on show display camera on stand by ,open camera but not working only show display error i have this problem tested solution see this solution
Blackberry bold 9000 loading 70% restart tested by me

see this solution and try now step by step i think solved your phone camera problem ,this problem solution many phone tested of me see and enjoy it and dont forget visit my blog.
Saturday, October 18, 2014
Nokia 2330 Classic Camera Problem Solution Jumpers Ways
Nokia 2330 Classic you can not take pictures with Nokia 2330 Classic.Or it may can bluer your pictures.In starting diagnostics you can check camera settings in you phone and if there is not camera settings problem you can do a hardware check.

After disassemble of Nokia 2330 Classic you can check all these parts that are given in above diagram with red lines.So make them clean if there is some rust or carbon parts.Apply heat with hot air and keep in mind do not apply much heat it can harm your skin and damage mother board also.
Re flow these parts and with resolding the camera can be in normal condition.Check resistant with meter if they do not shows good value you can apply jumpers also.Replace Camera in last stage if above tips do notwork.
for more detail and new tips and tricks about cellphone service problem keep visiting this page we will update cellphone service diagrams timely with new cellphone diagrams.some related post are also given bellow you can read them also for more information about cellphone.
Thursday, October 16, 2014
Format Micromax phone Without PC

Model-Restore-IMEI-Software/V,-Formatting
X1i- 1122 1122 -*#06# -*#8375#- *#8929#
X1u -1122 1122- *#06#- *#8375# -*#8929#
X211 -1122 1122 -*#06# -*#8375#- *#8929#
X332- 1122 1122- *#06#- *#8375# -*#8929#
X4i -1122 1122- *#06# -*#8375# -*#8929#
X511- 1122 1122 -*#06# -*#8375# -*#8929#
X414 -1122 1122 -*#06# -*#8375#- *#8929#
X800 -1122 1122 -*#06# -*#8375#- *#8929#
X112 -1234 1234 -*#06# -*#8375# -*#8929#
X113 -1234 1234- *#06#- *#8375# -*#8929#
X313 -N/ A N /A -*#06#- *#06#- *#73738#
X115- 0000 0000- *#06#- *#18375# or*#67638#- N/A
X225- 0000 0000- *#06# -*#18375# -N/A
X250- 0000 0000 -*#06# -*#67638# -N/A
X555- 1122 1122 -*#06# -*#8375#- N/A
X280 -0000 0000 -*#06# -*#8375#-N/A
Q3 -1122 1122 -*#06# -*#84666*# -N/A
GC 700- 0000 0000 -*#06# -*#67638# -N/A
GC255- 0000 0000 -*#06# -*#6629# -N/A
X2i -1122 1122- *#06#- *#8375#- N/A
X116 -0000 0000- *#06# -*#67638# -N/A
Unloking micromax-3010p-3010f-3011-2010L-2010
***99*979023#
0302*0#
0303*0#
0304*0#
0305*0#-uloking-2010L-2010
Model x1i,x1u,x2i,x211,x332,x4i,x511,x414,x800,x112,x113 & many more *#8929#
micromax c2i phone is locked use this code *#8929# formating code
Micromax Q7 codes
*#8375# - Software Version
*#8929# - Reset
*#1111# - WiFi
*#87# - Auto Hardware Test
*#1234# - A2DP Normal/PTS mode (no idea what PTS Mode is)
*#900# - BT Local Test (no idea about use)
*#901# - BT Local Test 1 (no idea about
Wednesday, October 15, 2014
iPhone 5s Tips and Tricks

Here are some How Tos for your iPhone 5s. These How Tos are still not yet complete and I am still working on the others. Visit this site often for the other how tos.
How to Factory Reset (Hard Reset) iPhone 5s
Restoring the default settings or factory reset your iPhone 5s will delete all your saved files. It is recommended to backup your important files on your computer before attempting to reset your device.
We have our own reasons why we factory reset our device. Maybe we want to delete all the files and restore the device to its original state. It could also be the device may be malfunctioning or so slow and it needs to be reset.
We have our own reasons why we factory reset our device. Maybe we want to delete all the files and restore the device to its original state. It could also be the device may be malfunctioning or so slow and it needs to be reset.
The steps below are the instructions on how to factory reset your iPhone 5s:
Step 1. On your iPhone, go to "Settings".
Step 2. Select "General" option.
Step 3. On the bottom of the Lcd, tap "Reset".
Step 4. You will be seeing a list of things which you can reset. If you want to reset all the content, select "Erase All Content and Settings".
Step 5. Tap "Yes" to confirm the action.
Now, you just need to wait while your iPhone 5 is wiping all datas or files on your device. In a short while your device will be good as new.
It is also recommended to Restart or reset your iPhone 5s first if something wrong before attempting to factory reset. This will also force your apps to quit.
Restart iPhone. Hold down the Sleep/Wake button until the red slider appears. Slide your finger across the slider to turn off iPhone. To turn iPhone back on, hold down the Sleep/Wake button until the Apple logo appears.
Force an app to quit. From the Home Lcd, double-click the Home button and swipe upwards on the app Lcd.
If you can’t turn off iPhone or if the problem continues, you may need to reset iPhone. Do this
only if you’re unable to restart your iPhone.
Reset iPhone. Hold down the Sleep/Wake button and the Home button at the same time for at least ten seconds, until the Apple logo appears.
You can reset the word dictionary, network settings, home Lcd layout, and location warnings. You can also erase all of your content and settings.
How to Import Contacts From Old Phone to New Phone (on Sony, iPhone, Samsung, HTC and Nokia)
Contacts is very important for everyone of us. We cant connect to our friends without a contact number. If you have a new phone, saving contacts on the phone one by one is so hassle. But now, theres an easy way how to transfer or import your contacts from your old phone to your new phone.
Use your PC to transfer contacts to your new phone. This process is applicable in several phone brands, including Sony, iPhone, Samsung, HTC and Nokia.
You just need an Internet Connection on your PC, your old and new phone and their own USB cable.
Then you need to install the PC Companion program. This is a free application and the installation files are already saved on your new phone. This program can also be used in updating your phone software.
Please note that if you are using the Microsoft Windows 7 operating system on your PC, make sure that the AutoPlay setting is enabled.
To check your settings:
Click Start > Control Panel, then type "autoplay" on the search box. Click the AutoPlay, and mark the check box Use AutoPlay for all media and devices.
Installing the PC Companion:
Installing the PC Companion:
- Turn on your new Phone and connect it to your PC.
- On your new Phone, tap "Install" to install PC Companion on the PC.
- On your computer, if a pop-up window that appears notifies you about available PC Software, select Run Startme.exe.
- Then click Install to start the installation and then follow the instructions to complete the installation.
If you are not prompted with a pop-up window to install the PC Companion, you can also download the PC Companion here.
Transferring your contacts to your new phone:
- Make sure that PC Companion is installed on your PC.
- Open the PC Companion application on your PC.
- Then click Contacts Setup and follow the instructions to transfer your contacts.
How to Import Movies on iPhone 5s
Bored? Want to watch movies on your iPhone but dont know how to import it. Well, no worries. Heres a very simple steps on how to import movies from your PC to your iPhone.
Step 1. Use the USB cable and plug your iPhone into your computer. iTunes should automatically open.
Step 2. Click the "Movies" tab in the center of the iTunes browser window.
Step 3. Check the boxes next to the movies you want to sync, or you can select "Automatically include (all) movies."
Step 1. Use the USB cable and plug your iPhone into your computer. iTunes should automatically open.
Step 2. Click the "Movies" tab in the center of the iTunes browser window.
Step 3. Check the boxes next to the movies you want to sync, or you can select "Automatically include (all) movies."
Step 4. Click the "All" box to bring up a drop-down menu, then select the option of your choice.
Step 5. Select "Move" next to any rented movies.
Step 6. Click "Apply" in the bottom-right corner of the window.
If you just got your new iPhone 5s, you’d never want to leave it sitting blankly for even an hour. You’d even want to use it till its battery gone dead. It’s common for Apple users to get fascinated and hooked with iDevices’ cool features. If you are that addicted, saving your battery life could perhaps give you another hour of gaming spree and even lengthen your devices’ life. Here are some few things though that you must know on how to save battery life on your iDevices.
1. Turn off vibrate feature when playing games. Avoid playing intensive video games as this will kill your battery quickly.
2. You might not know this, but by adjusting your devices’ volume to low or none at all, you are eventually saving a small amount of battery life. Go to Settings menu, select General and head on to Sounds to adjust your devices’ sound system.
3. Just like computers, keeping your iDevices’ Lcd at maximum brightness will consume more battery life. Adjust your Lcd settings to low by going to Settings and select Brightness and Wallpaper to change the default level of brightness.
4. Switch to Airplane mode when you don’t need to use the internet. Airplane mode basically turns off both Wi-Fi and the regular wireless radio. However this will also prevent calls from coming in. If you’re just playing a regular game and doesn’t want any disturbances (like a phone call perhaps), might as well switch to Airplane mode to save battery life.
5. 3G connection uses up more battery life compared to Wi-Fi. So if possible, use Wi-Fi especially on hotspot instead of 3G. According to Apple, iPhone on the other hand gets 10 hours for Wi-Fi and only 6 hours for 3G.
6. Disable Bluetooth radio when not needed. Go to Settings, then General and Bluetooth to switch off.
7. Turn off Push Notifications. Every time you get notifications from Facebook , Twitter or any apps your using, you’re also consuming your battery life. If you can check those apps manually, you can turn off the notifications by heading to Settings, Notifications and switch to off to save a bit of battery life.
8. Set your Lcds to lock quickly when not in use. Go to General; select Auto-Lock to set your Lcd to lock quickly before you put it back on your pocket or bag.
9. Keep your devices out of the sun or any hot surfaces. Heat kills batteries quickly.
iPhone 5s is dubbed to have a perfect fit on your hand compared to other smartphones in the market. The phone is slimmer, even lighter and has a higher-resolution compared to its predecessors. This 4-inch smartphone allows you to change its Lcd/menu colors for a customize phone and of course for easy viewing. Check out these easy and simple steps and try it yourself.
1. On your iPhone 5s, press on Settings icon.
2. Then go to General.
3. On the list, scroll down to Accessibility.
4. And then switch to turn on the Invert Colors option. That’s how you change your Lcd color for easy viewing.
1. On your iPhone 5s, press on Settings icon.
2. Then go to General.
3. On the list, scroll down to Accessibility.
4. And then switch to turn on the Invert Colors option. That’s how you change your Lcd color for easy viewing.
With its sleek and stunning features, iPhone 5s is surely one of the best of its kind. Apple has finally connected iPhone to the fastest cellular data network called the LTE. Uploads, data download, internet browsing is faster than you think even when it’s not on WiFi connection. Nevertheless, here are few steps on how you can turn on/off your wifi settings on your mighty iPhone 5s.
1. On your iPhone 5s device, press on the Settings icon.
2. Select on WiFi on the menu options.
3. Now there’s a switch button on top of your Lcd. If you click on that, it’ll turn on the Wifi Settings in blue color. Press the same button to turn off WiFi.
4. Take note that when you turn on your WiFi settings, it will search for available networks in the local area.
Choose a network: Tap one of the listed networks and enter the password, if asked.
• Ask to join networks: Turn on “Ask to Join Networks” to be prompted when a Wi-Fi network is available. Otherwise, you must manually join a network when a previously used network isn’t available.
• Forget a network: Tap i icon next to a network you’ve joined before. Then tap “Forget this Network.”
• Join a closed Wi-Fi network: Tap Other, then enter the name of the closed network. You must already know the network name, security type, and password (if required).
• Adjust the settings for a Wi-Fi network: Tap i icon next to a network. You can set an HTTP proxy, define static network settings, turn on BootP, or renew the settings provided by a DHCP server
Monday, October 13, 2014

Thursday, October 2, 2014
Reset LG Spectrum VS920 to Restore Factory Settings
Reset LG Spectrum VS920 to Restore Factory Settings - LG Spectrum VS920 options an oversized 4.5” HD-IPS lcd electrical phenomenon touchLcd (720 x 1280 pixels resolution) with Corning gorilla Glass protection, True HD Graphic Engine, Touch-sensitive controls, Multitouch, Gyro detector, measuring system and Proximity detector. It runs on android OS v2.3 (Gingerbread) with the support of dual-core 1.5 ghz Scorpion CPU, Adreno 220 GPU, Qualcomm MSM8660 flower chipset, and 1 GB RAM. It provides 4 internal GB storage and 16GB microSD that may be swollen up to 32GB. The property options consist of: Wi-Fi 802.11 a/b/g/n, DLNA; Wi-Fi Direct; Wi-Fi hotspot; Bluetooth v3.0 with A2DP, EDR; and microUSB (MHL) v2.0. For the camera, its 8 MP camera with optical device, LED flash, Geo-tagging, face detection, image stabilization, and video capability with LED video lightweight (1080p@30fps). theres conjointly a secondary 1.3 MP camera.

Reset LG Spectrum VS920 to Restore Factory Settings
How to perform a factory reset:
- From the Home Lcd, touch the Menu Key .
- Touch Settings > Privacy > Factory data reset. NOTE Touch the checkbox to also erase all contents from your microSD card when the phone is reset.
- Read the warning and touch Reset phone.
- Touch Erase everything.
How to perform a factory reset if you can’t access the phone’s setting menu:
- Turn the power off.
- Touch and hold the following keys at the same time for 12 seconds: Power/Lock Key + the down Volume Key.
- Release the keys when you see the Lcd message "Permanently Erase User Data & Reset Settings?, press the Power Key to confirm and any other key to cancel."
- Press the Power/Lock Key to confirm (or press any other key to cancel). When you press the Power/Lock Key “GAMBAR ICON” to confirm, a pop-up appears asking “Are you sure you want to continue with erase?”.
- Press the Power/Lock Key and your phone will be restored to the factory settings. To cancel, press any other key.
- Caution: If you perform a factory reset, all user applications and user data will be deleted. Please remember to back up any important data before performing a factory reset.
Subscribe to:
Comments (Atom)
